Table of Contents
PMS Monitor
The hospitality service works quietly in the background, with no GUI front-end to look at. Instead, 8.00 provides a client application called PMS Monitor which can be used to view the serial communication traffic between the VMS and the PMS. The figure below shows the main window of this application with a handful of log entries displayed.
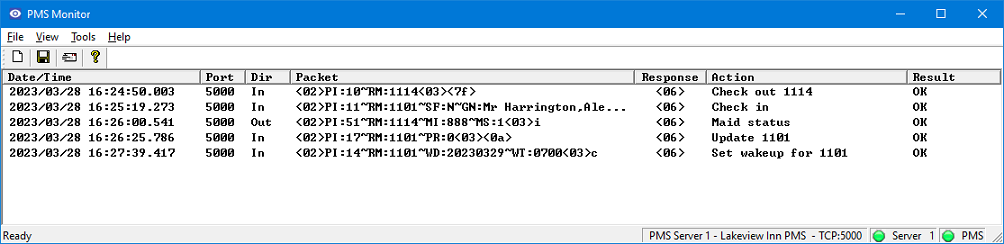
Each line in the table represents a single communication exchange between the two systems, including the packet or control character transmitted by the sender and the ACK or NAK character transmitted by the receiver in response. The following fields comprise the data displayed for each exchange:
| Column | Description |
|---|---|
| Date/Time | The date and time this entry was logged. The date format by default is MM/DD/YYYY and the time format is HH:MM:SS.msec. |
| Port | The port number over which the communication took place. COM ports will fall in the range from 1-255, whereas TCP ports are typically above 1024. |
| Dir | The direction of the communication, In or Out. In means the message was received from the PMS; Out means it was sent to the PMS. |
| Packet | The raw packet or control byte received, if relevant. For some entries, this may be blank if no actual data was transferred. Non-printable ASCII characters generally cannot be displayed on-screen by most fonts, so PMS Monitor displays them using a special notation: a two-digit hexadecimal value inside of angle brackets. Any hex value between 0x00 and 0x19, inclusive, will be displayed using this notation. |
| Response | The control character sent back to the PMS in response to a message received, or received from the PMS in response to a message sent. Typically, this will either be <06> (ACK) or <15> (NAK). If the PMS does not respond within the time allowed (typically a few seconds), this field may display something like (timeout) instead.If the entry is for an event or message where a response is not expected or not relevant, this field will be left blank. |
| Action | A statement indicating the action taken by the 8.00. For inbound packets, this will indicate how the 8.00 interpreted and processed the message. For outbound packets, it will typically state what type of message was sent. For connection events, it will state the IP address of the PMS that has connected. This occurs only if the hospitality server is configured to use a TCP Server connection (where the 8.00 is the server that opens the port and waits for the PMS to connect). There will be a corresponding disconnect entry if the PMS closes the connection. |
| Result | A statement indicating the success or failure of the action indicated in the Action column, from the perspective of the 8.00. |
Clearing the Window
To clear the data from the window at any time, click the Clear button on the toolbar (the blank page icon) or select View | Clear from the main menu.
Saving the Data
To save the currently displayed data to a comma-separated value (CSV) text file, select File | Save from the main menu or click the Save button on the toolbar (the diskette icon). The first time you do this, the File Save As dialog will be displayed. Navigate to the folder where you want to save the file, enter a filename and click Save to save it.
Any time you select File | Save (or click the Save button) from that point on, PMS Monitor will just overwrite the existing file. If you want to save to a different filename, choose File | Save As from the main menu instead.
Sending Test Packets
PMS Monitor has the ability to signal the hospitality service to send a polling (keep-alive) packet or to send a request for database swap. This feature can be accessed by clicking the send message icon on the toolbar, highlighted below, or by selecting Tools | Send message from the menu.

This will open the Send Message dialog, shown below:
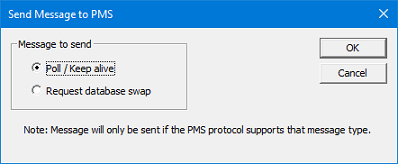
Click the radio button for the message type that you wish to send. Then click OK to send it.
As noted on the dialog above, the message can only be sent if the protocol supports that message type. If it does not, an error message will be displayed and you can click OK to close it.
If the message was successfully sent, an entry for it will appear in the main window.