|
DV2000/DV4To configure the DV2000/DV4 system, you will first need to stop the service using Activity Monitor. Once the service has stopped, run the System Configuration program. Enter the password (if prompted to do so); the default password is duvoice.
Once you have finished the configuration as described below, close the System Configuration application and then use Activity Monitor to restart the voice mail service.
Enable the PMS Pass-through Feature
To enable and configure the pass-through feature for the ACM, select Features | Connectors from the main menu, as shown in the figure below:

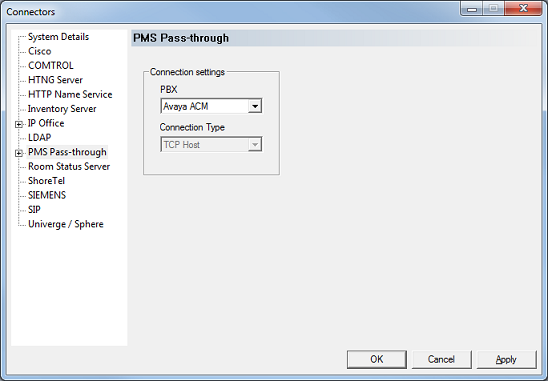
This will open the Connectors dialog, shown below. On the left pane, click on the PMS Pass-through option to display the PBX selection box.

Settings include:
Setting
|
Description
|
PBX
|
Use the drop-down list box to select Avaya ACM.
|
Connection Type
|
Automatically set to TCP Host when you select Avaya ACM as the PBX type.
|
Click Apply to save your changes.
Configure the PMS Pass-through TCP Settings
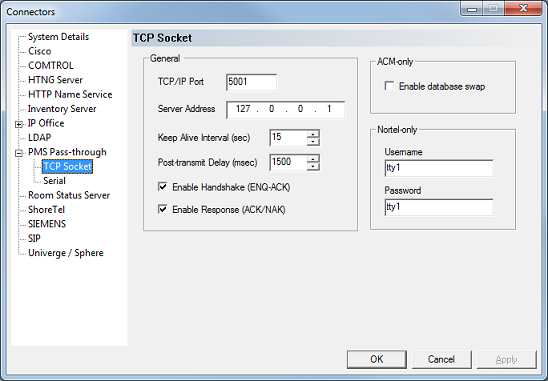
On the left pane of the Connectors dialog shown in the previous step, click the TCP Socket sub-option beneath PMS Pass-through, as shown below:

Settings include:
Setting
|
Description
|
TCP/IP Port
|
Enter the port number you configured on the ACM.
Refer to the Change ip-services section.
|
Keep Alive Interval (sec)
|
Enter a value that is less than the Seconds Before PMS Link Idle Timeout setting that you configured in the Change system-parameters hospitality section when configuring the ACM.
For example, if you set the value on the ACM to the default value of 20 seconds, you should set this value to 15 seconds.
The default value is 15 seconds.
|
Post-transmit Delay (msec)
|
Enter the length of time, in milliseconds, that the system should wait after receiving an ACK from the ACM before trying to send another message to the ACM.
In some cases, the ACM cannot keep up with messages being sent too quickly and this delay will artificially slow the pace of message traffic.
The default value of 1500 msec (1.5 seconds) should be sufficient.
|
Enable Handshake
|
Check this box.
The DV2000/DV4 will send an enquiry (ENQ) byte to the ACM and wait for an ACK response before sending a message packet, each time it needs to send a message to the ACM.
|
Enable Response
|
Check this box.
Some systems do not use ACK/NAK responses when using TCP/IP for communication. The Avaya ACM, however, does.
|
Enable database swap
|
Check this box if you want the DV2000/DV4 to perform a full database swap whenever the ACM requests it.
If disabled, the system will respond to a swap request by sending a start swap packet followed immediately by an end swap packet.
|
The remaining settings (including the Server Address field) are not relevant when using the Avaya ACM.
Click OK to save your changes and close the dialog.
Configure the Hospitality Phone Control Settings
To configure the hospitality phone control settings, select Features | Hospitality as shown in the figure below:

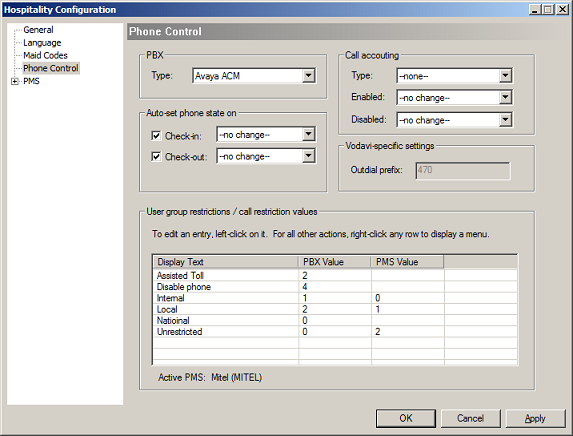
In the Hospitality dialog, select the Phone Control option in the left pane, as shown in the figure below:

Settings include:
Setting
|
Description
|
PBX Type
|
Select Avaya ACM.
|
Auto-set phone state on
|
To send a specific phone restriction level at check in or check out, check the appropriate box and use the drop-down list to select the value to be sent.
If you are connected to a PMS that sets the phone restriction as part of the check in and/or check out process, disable these options (uncheck the boxes and/or select --no change--). Otherwise, either these settings will override the PMS, or vice-versa.
The options available in the drop-down box are drawn from the User group restrictions table.
|
Call Accounting
|
These settings are not directly relevant to the ACM pass-through configuration and are described elsewhere.
|
User group restrictions
The user group restrictions table is used to map the supported PBX values to the supported PMS values and to provide a text description for each COS.
Column
|
Description
|
Display Text
|
Enter a descriptive word or phrase for each phone restriction level.
This text will be used when displaying the phone restriction options in InnDesk and in the Auto-set phone state on drop-down boxes described above.
|
PBX Value
|
For the ACM, these values are hard-coded in the PBX and should not be changed.
These values are:
0 = No restriction
1 = Outward / toll restriction (configured on the PBX)
2 = Station-to-station / toll restriction (configured on the PBX)
3 = Combination of #1 and #2
4 = Total restriction (that is, cannot make or receive any calls)
5 = Termination restriction (cannot receive calls)
6 = Combination of #1 and #5
7 = Combination of #2 and #5
The exact meaning of values 1 and 2 depend on the configuration of the ACM, as discussed in the Change system-parameters features section.
Where possible, always match a PBX value to each possible PMS value, even if you have to assign the same PBX value to multiple PMS values. That way, when the system will know what to send to the ACM whenever the PMS sends a message to change the phone restriction level.
|
PMS Value
|
Enter the PMS value that equates to the given ACM value.
These values will vary depending on the PMS protocol. Consult your PMS documentation or vendor for more details.
Note: Most PMS protocols do not support all 8 possible levels provided by the ACM. It is OK to leave the PMS value blank in those cases where the PMS does not provide a matching value.
|
Note: If you change the values and need to go back to the default settings, right-click on the table and select Reset to defaults.
|


