|
Mailbox Administration is the primary application the system administrator will use to configure and manage the DV2000/DV4 voice messaging system (VMS). It allows you to create, delete and edit both mailboxes and the system templates that are used to modify mailbox behavior.
To access Mailbox Administration, select Start | Mailbox Administration. If prompted to do so, enter your password and click OK. By default, no password is required; however, Mailbox Administration can be configured to require one.
As shown below, the main application window displays the list of mailboxes (or a portion thereof), in a grid format that includes most the key mailbox features and settings you might be interested in:
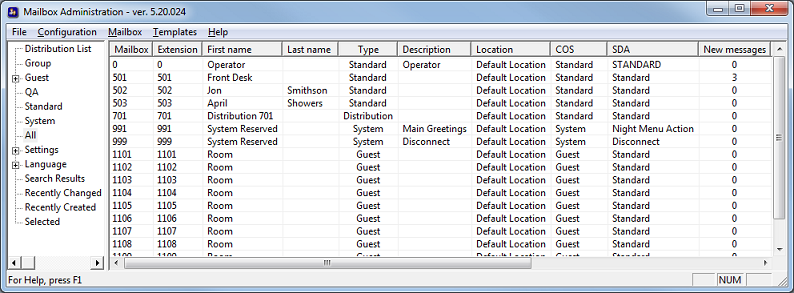
The window is split into two panes: the category list on the left and the mailbox list on the right.
Category List (Left Pane)
The left pane lists a number of different categories (and sub-categories) by which you can filter out all mailboxes except those that fit the selected category. This can be very useful if you want to know which mailboxes are of a particular type, or have a particular setting enabled, without having to search through a list of dozens or even hundreds of mailboxes to find them. Just click on the desired category and the list in the right-hand pane will be refreshed to only display the mailboxes that fit in the selected category.
Setting
|
Description
|
Distribution List
|
Only display mailboxes of type distribution.
|
Group
|
Only display mailboxes of type group.
|
Guest
|
Only display mailboxes of type guest.
|
QA
|
Only display mailboxes of type QA.
|
Standard
|
Only display mailboxes of type standard.
|
System
|
Only display mailboxes of type system.
|
All
|
Display all mailboxes.
|
Settings
|
Only display mailboxes that have the given mailbox setting enabled.
You can select from the following settings: Call blocking, Call screening, Tutorial incomplete and Hidden from directory.
These settings are generally only applicable to standard mailboxes, not guest mailboxes. So selecting Tutorial incomplete will show you all standard mailboxes where the user has not completed the tutorial.
|
Language
|
Only display mailboxes that are configured to use the selected language.
Only installed, active languages will appear as sub-categories in this list. Default refers to the default language, as set in System Configuration.
|
Search Results
|
Display all mailboxes that match the search criteria.
|
Recently Changed
|
Display all mailboxes that have been modified in any way since the current session of Mailbox Administration was launched.
|
Recently Created
|
Display all mailboxes that have been created since the current session of Mailbox Administration was launched.
|
Selected
|
Only display the mailboxes you have selected in the right pane.
|
Mailbox List (Right Pane)
The right pane displays useful mailbox data for all mailboxes that match the currently-selected category. Each row in the table represents a single mailbox.
Column
|
Description
|
Mailbox
|
The mailbox number.
|
Extension
|
The physical extension number assigned to the mailbox (also called the Office Extension in the address list).
|
First name
|
The subscriber's or guest's first name.
For all mailbox types except guest and standard, the single name field maps to this column.
|
Last name
|
The subscriber's or guest's last name.
|
Type
|
The mailbox type.
|
Description
|
A custom description field. By default, this field is blank.
|
Location
|
The location to which this mailbox is assigned.
|
COS
|
The class of service template assigned to this mailbox.
|
SDA
|
The single digit action menu assigned to this mailbox.
|
New messages
|
The new message count.
|
Last login
|
The date and time the subscriber last logged into the mailbox.
|
Last message
|
The date and time the most-recent message was received.
|
Modified
|
The date and time the mailbox was last modified.
|
Created
|
The date and time the mailbox was created.
|
To change the width of any of the columns, place the mouse pointer to the right of the column so that it changes to the double-arrow pointer, then left-click and drag the mouse left or right to decrease or increase, respectively, the width of the column. Also, you can re-order the columns by left-clicking on the column header and dragging it left or right to a new position. These changes will only remain for the current session; the next time you run Mailbox Administration it will return to the default settings.
|


