Edit (multiple)
Mailbox Administration provides several options for editing multiple mailboxes at once, if all you want to do is change one specific setting.
To start, select one or more mailboxes you want to edit. To select multiple, non-contiguous mailboxes, press the Ctrl key and left-click on each mailbox you want to edit. Or, to select several mailboxes in a row, left-click on the first mailbox; then, while holding down the Shift key, left-click on the last mailbox in the group you want to select.
Once you have selected the mailboxes to be edited, right-click on any one of the highlighted mailboxes to display the context menu, as shown in the figure below.

Select the Edit option to display a submenu of the various actions you can perform. The Add Template and Remove Template options each have a further submenu to designate which type of template you are adding or removing, and the Set option has a submenu to designate whether you are setting the class of service (COS), the single digit actions menu (SDA) template, the profile, the tenant, or the line to use for MWI.
Add Address
This option allows you to add a single address to each selected mailbox. You can only add one address at a time. You do not, however, have to add the same address type to each of the selected mailboxes; they can all be different.
When you select this option from the context menu, a dialog similar to that shown below will be displayed (this image has been cropped to show only the relevant parts).
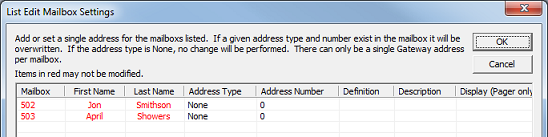
The relevant mailbox data is displayed in tabular format, one mailbox per row. Data displayed in red cannot be edited. In the image shown above, the Mailbox, First Name and Last Name fields are all displayed in red and therefore cannot be edited in this dialog. The remaining fields (Address Type, Address Number, Definition, Description, and Display) can all be edited to define a single address to be added for the given mailbox.
Each field can be edited in-place. Simply click inside the field to activate that field for editing. The Address Type and Address Number fields are both selection boxes that let you choose a valid address type and address number to edit, as shown in the figure below.
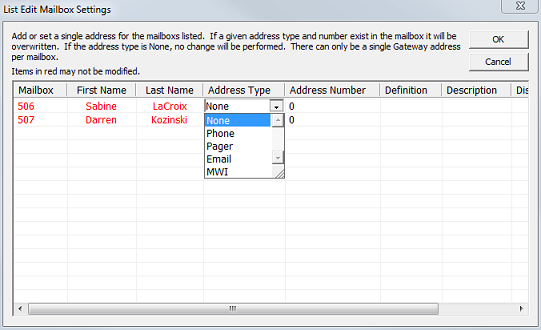
You can only add the address types shown: Phone, Pager, Email, and MWI. To add any other address type to a mailbox, you must use the normal method for editing the address list of a mailbox. For each type, you can select a number from 0 to 9. If you leave the Address Type set to None, then no action will be taken for that mailbox.
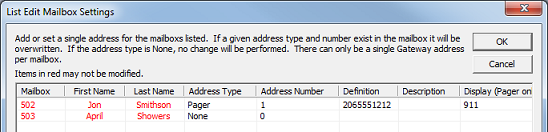
Once you have selected the address type and number, you can edit the Definition, Description and Display fields for the selected address. All three are simple text-entry fields; just click in the appropriate box on the grid to edit the field. The figure below shows the Display field being edited to add a pager number for the address Pager 1 for mailbox 502.
The Definition field specifies the actual address—the phone number to dial or the email address to send to. This should not include any trunk access code as that will be automatically dialed first based on the relevant location settings. However, it should include the long distance access code and area code, if needed. To include any pauses, add a comma for each one-second pause (not supported on SIP systems).
The Description field is purely informational and does not affect the use of the address in a notification or message delivery template in any way. Use it to identify the purpose of the address, such as distinguishing between “Home Phone Number” and “Cell Phone Number”.
Finally, the Display field, as noted in the dialog, is for use with the Pager address type only. Use this field to specify any DTMF digits that the VMS should dial after dialing the pager number in the Definition field. Pager notification typically does not employ call supervision, so you may need to experiment with adding pauses either to the end of the Definition field or the beginning of the Display field in order to allow enough time for the pager service to answer before dialing the Display digits.
Once you have edited all the appropriate fields for each mailbox you selected, click OK to add the addresses or Cancel to close the dialog without adding anything.
Any mailbox that is in use (i.e., the subscriber is logged in) when the system attempts to add the address will be skipped; you will be notified if that happens.
Add / Remove Template
These options allow you to select a specific message delivery or notification template and either add it to or remove it from several mailboxes at once.
For example, all standard and guest mailboxes are configured with the standard MWI On and MWI Off notification templates which, by default, use the inband outdial method to turn an extension's message light on or off. However, a hospitality site may decide they want the PMS to control the message lights for guest rooms while allowing the VMS to control the lights for employee mailboxes. To accomplish this, they would need to create alternate versions of the MWI On and MWI Off notification templates that use the PMS Only outdial method and then assign those templates to all guest mailboxes (and remove the default templates from them). The techniques described in this section would allow them to accomplish this in just a few easy steps rather than having to edit each mailbox individually.
Add a Template
To add a template to multiple mailboxes, select all mailboxes to be edited, then right-click on any one of them. From the context menu, select Edit | Add Template and then click on either Message Delivery or Notification; these are the only types of template that can be added in this fashion. The figure below shows an example of adding a message delivery template:
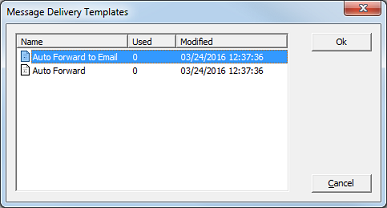
Select the template you wish to add from the list provided and click OK to add it.
The system will add the template to each mailbox you selected, subject to the following caveats:
- If a mailbox already has that template assigned, it will not be added again.
- If the mailbox already has the maximum number of templates assigned for that template type, the template will not be added.
- If the template uses an address that is not defined for that mailbox, the template will be added but will be marked as disabled.
- If the mailbox is in use (i.e., the subscriber is logged in), the template cannot be added; you will be notified if that happens.
Remove a Template
To remove a template from several mailboxes, select the mailboxes to edit, then right-click on any one of them. From the context menu, select Edit | Remove Template and then click on either Message Delivery or Notification; these are the only types of template that can be removed in this fashion. A dialog similar to the one shown above will appear, listing all active templates of the given type.
Select the template to remove and click OK.
The system will remove the specified template from all selected mailboxes. However, if the mailbox is in use (i.e., the subscriber is logged in), then the mailbox will be skipped because it cannot be edited while it is in use; you will be notified if that happens.
Owner Settings
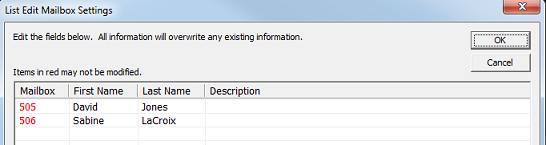
This option allows you to edit the subscriber's name and the mailbox description, using the dialog shown below.
Settings include:
| Column | Description |
|---|---|
| Mailbox | Mailbox number. Read-only. |
| First Name | Subscriber's first name. Can be edited in-place. Click inside the box and enter the desired text. Limited to a maximum of 24 characters. |
| Last Name | Subscriber's last name. Can be edited in-place. Click inside the box and enter the desired text. Limited to a maximum of 24 characters. |
| Description | Optional description field. You may enter any text you wish or leave it blank; it is purely informational. Can be edited in-place. Click inside the box and enter the desired text. Limited to a maximum of 19 characters. |
Once you have edited the fields to your satisfaction, click OK to save your changes. Any mailbox that is in use at the time the system attempts to apply the changes will be skipped; you will be notified if this happens.
Set Class of Service
To change the assigned class of service (COS) template for several mailboxes at once, select the mailboxes to edit, right-click on any one of them, and then select Edit | Set | Class of Service from the context menu. The figure below shows the dialog that appears, listing all active class of service templates from which you can choose.
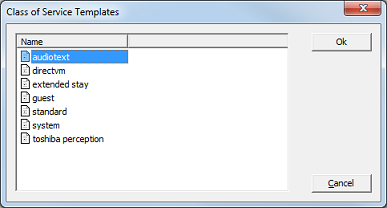
Select the template to assign and click OK.
The system will edit each mailbox, replacing the assigned class of service with the template you selected. If any mailbox is currently in use (i.e., the subscriber is logged in), the system will not be able to change the COS and will have to skip over that mailbox; you will be informed if this happens.
Set Single Digit Action
To change the assigned single digit action (SDA) menu for several mailboxes at once, select the mailboxes to edit, right-click on any one of them, and then select Edit | Set | Single Digit Action from the context menu. The figure below shows the dialog that appears, listing all active SDA templates from which you can choose.
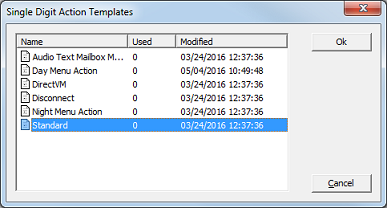
Select the template to assign and click OK.
The system will edit each mailbox, replacing the assigned SDA with the template you selected. If any mailbox is currently in use (i.e., the subscriber is logged in), the system will not be able to change the SDA and will have to skip over that mailbox; you will be informed if this happens.
Set Profile
To change the assigned profile for several mailboxes at once, select the mailboxes to edit, right-click on any one of them, and then select Edit | Set | Profile from the context menu. The Select Profile dialog provides a selection box that lists all available profiles from which you can choose.
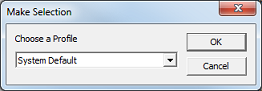
Select the profile to assign and click OK.
The system will edit each mailbox, replacing the assigned profile with the one you selected. If any mailbox is currently in use (i.e., the subscriber is logged in), the system will not be able to change the profile and will have to skip over that mailbox; you will be informed if this happens.
Set Tenant
To change the assigned tenant for several mailboxes at once, select the mailboxes to edit, right-click on any one of them, and then select Edit | Set | Tenant from the context menu. The Select Tenant dialog provides a selection box that lists all available tenants from which you can choose.

Select the tenant to assign and click OK.
The system will edit each mailbox, replacing the assigned tenant with the one you selected. If any mailbox is currently in use (i.e., the subscriber is logged in), the system will not be able to change the tenant and will have to skip over that mailbox; you will be informed if this happens.
Set MWI Line
With some PBX systems, it is necessary to have the same line send the MWI off code as sent the on code. Often this can be handled by configuring only one line for MWI notifications (in the Profile settings). However, if you have a lot of mailboxes, this may be impractical.
To specify which line you want the selected mailboxes to use for MWI, right-click on one of them and select Edit | Set | MWI Line. This will open the Set MWI Line dialog, shown below.
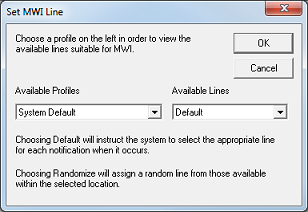
Use the Available Profiles selection box to choose a profile. This will determine what lines are listed in the Available Lines selection box, based on which lines are configured to perform MWI notifications for the selected profile.
The Available Lines selection box also includes the following two options:
| Option | Description |
|---|---|
| Default | This option tells the VMS to select the appropriate line for each notification at the time the notification is performed. This is the default setting for all mailboxes. |
| Randomize | This option means that when you click OK, the VMS will assign a randomly selected line from the available lines in the selected profile and that line will be used from then on. |
Select the line you want to assign, or one of the two options listed above, and then click OK. To close the dialog without making any changes, click Cancel.
If any of the mailboxes you selected are associated with a profile that does not allow MWI notifications for the selected line, then the setting will not be changed for those mailboxes.