|
Hospitality Tester is a simple GUI application that can be used to test a number of basic hospitality features on the DV2000/DV4 system, to ensure that the correct data is then passed on to the PMS and/or the PBX as appropriate.
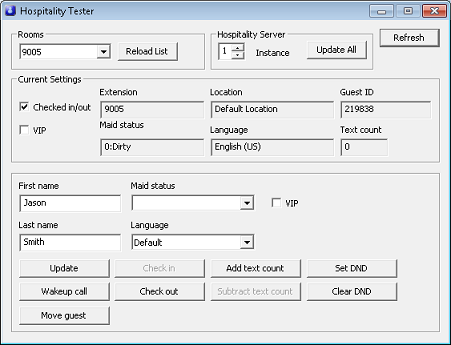
You can access the application by selecting All Programs | DuVoice | Testing | Hospitality Tester from the Start menu (this will differ if you are using a Windows 10 system). The figure below shows the main window.

The first step in using Hospitality Tester is selecting the mailbox to use and the hospitality server instance with which to communicate. These and a couple other options are found at the top of the dialog shown above. Options include:
Setting / Button
|
Description
|
Room selection box
|
Use the drop-down box to select an existing room mailbox.
The data for the selected room will be automatically read and displayed in the Current Settings section (described below).
|
Reload
|
Click this button to repopulate the selection box with all existing guest mailboxes.
If mailboxes have been created or deleted while Hospitality Tester is running, you will need to use this click this button to ensure the selection box has the correct list of mailboxes.
|
Instance
|
Use this option to select which hospitality server to communicate with.
In most cases, this will always be instance 1. You will only need to change this value if your system is licensed for multiple PMS and you have actually configured and enabled more than one server instance.
|
Update All
|
Click this button if you want to generate a lot of test packets at once, roughly simulating a database swap.
When you click this button, Hospitality Tester will send a room update message to the hospitality server for every room listed in the room selection box. The information sent in the update will be the same information already set in the given room.
One possible use for this option is if the guest names are correct on the voice mail but not on the PBX. Using this option to send an update message for each room will cause the hospitality server to send a name change to the PBX for each room as well, thereby updating the names on the PBX to match those on the VMS.
|
Refresh
|
Click this button to re-read the data for the selected room.
|
Current Settings
The application displays the current values for a number of relevant room mailbox settings, including the following:
Setting
|
Description
|
Checked in/out
|
If the box is checked, the room is marked as checked in; otherwise, it is checked out.
|
VIP
|
If the box is checked, the room is flagged as a VIP.
|
Extension
|
Displays the primary extension associated with the mailbox.
|
Maid status
|
Displays the current assigned maid (or room clean) status for the room, in the format number:text. The number part is the digit dialed by the maid, and the text part is the descriptive text associated with that digit (as configured in the Hospitality settings in System Configuration).
|
Location
|
Displays the location to which the mailbox is assigned.
|
Language
|
Displays the current assigned language.
The value Default means the system default language will be used, whatever that may be.
|
Guest ID
|
Displays the guest ID for the primary guest in the room.
This is only relevant if the PMS link is configured for Micros Fidelio Opera over a TCP/IP link; all other protocols are room-based, so this field would be blank.
|
Text count
|
Displays the count of text messages.
Depending on the PMS protocol in use, this may be treated as a flag, where 0 means 'off' and 1 means 'on'.
|
Configurable Values
Below the Current Settings group are four boxes you can use to change certain settings. These values are used when sending the test commands to the system. For example, the Check in command will use the First name, Last name and Language values when sending a check in to the system.
Setting
|
Description
|
First name
|
Displays the current first name associated with the mailbox.
To change the first name for the mailbox, enter it here and then click the Update or Check in command. On check out, the first name is automatically reset to Room.
|
Last name
|
Displays the current last name associated with the mailbox.
To change the last name for the mailbox, enter it here and then click the Update or Check in command. On check out, the last name is automatically cleared.
|
Maid status
|
Use this drop down box to select a maid status to assign, then click Update to send an update request to the system.
|
Language
|
Use this drop down box to select a language to assign, then click Update to send an update request to the system.
This option is disabled if the room mailbox is checked out.
|
VIP
|
Check the box to flag the room as a VIP or uncheck it to remove VIP status.
|
Commands
Hospitality Tester supports the following commands. Some commands will be enabled or disabled based on whether the loaded room mailbox is currently checked in or out.
Check In
Click this button to send a check in command for the specified room to the hospitality server. The first and last name fields are included as part of the check in.
Check Out
Click this button to send a check out command for the specified room to the hospitality server. All settings will revert to the default values, including the name fields.
Update
Click this button to send an update command for the specified room to the hospitality server. An update command will include the name fields, the maid status and the language selection.
Wakeup Call
Click this button to schedule an immediate wakeup call for the specified room.
Move Guest
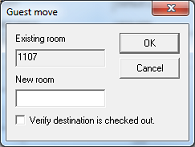
Click this button to send a room move command for the specified room to the hospitality server. Before the command is sent, the application will open a dialog, shown below, prompting you to enter a destination room.

Enter the destination room where indicated. To test a true room move, check the box labeled Verify destination is checked out. Or, to test a room merge (moving a guest into an already checked in room), leave the box unchecked. Click OK to send the move command.
If the move is successful, the Room field will be changed to the new (destination) room number.
Add or Subtract Text Count
Click the Add Text Count button to increment the text message count. Click Subtract Text Count to decrement the count.
When the count transitions from 0 to 1, the extension message light should be turned on. When the count transitions from 1 to 0, the MWI should be turned off (unless the room mailbox contains voice messages; in that case, the light should remain on until all new messages are saved or deleted).
Set or Clear DND
Click Set DND to turn on the DND feature and Clear DND to turn it off.
Note: Whether the DND on/off command is passed to the PBX depends on configuration and on whether the PBX protocol allows for DND to be toggled. If it is not supported, then these commands may have no noticeable effect.
| 


