|
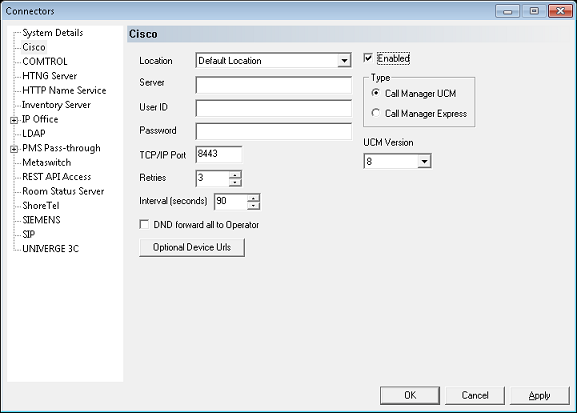
DV2000/DV4 can connect to a Cisco Unified Communications Manager PBX (CUCM) using TCP/IP. The dialog below shows the configuration settings for this connection.

Settings include:
Setting
|
Description
|
Location
|
Select the location with which this PBX is associated. The remaining settings are valid for the selected location only.
If you have multiple locations and they are all using the same CUCM, you will need to configure the settings identically for each location
|
Enabled
|
If checked, the settings for the selected location are enabled.
If not checked, the settings are disabled and the system will not send name or Calling Search Space changes to the PBX for mailboxes that are assigned to the selected location.
|
Server
|
Enter the IP address or DNS name of the Cisco UCM.
|
User ID
|
Enter the user ID of the DuVoice account you created in the CUCM.
|
Password
|
Enter the password of the DuVoice account you created in the CUCM.
|
TCP/IP Port
|
Must be set to 8443 unless you have changed it in the Cisco administration.
|
Retries
|
Enter the number of times to retry on failure.
|
Interval (seconds)
|
Enter the number of seconds to wait between retries.
|
DND forward all to Operator
|
If checked: When DND is set for a subscriber mailbox, the system will set forward all to the extension of the operator assigned to the same location as the mailbox. When DND is turned off, the forward all feature is disabled on the PBX.
|
Optional Device URLs
|
Opens the Cisco UCM PBXLink Device URLs dialog box, discussed below.
|
Type
|
Select Call Manager.
Call Manager Express is not supported.
|
UCM Version
|
Select the version number of your CUCM. Supported versions are: 6, 8 and 11.
|
To save your changes and exit the dialog, click OK. To save without closing the dialog, click Apply. To cancel any changes not previously applied, click Cancel.
Optional Device URLs
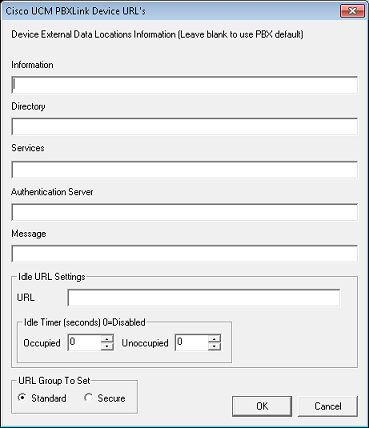
When you click this button, the Cisco UCM PBXLink Device URLs dialog is displayed:

These settings are entirely optional. To use the PBX defaults, leave these setting blank.
Settings include:
Setting
|
Description
|
Information
|
Enter the URL of the server from which the phone retrieves help text when the guest presses the information button or question mark button.
Leave blank to use the default setting on the PBX.
|
Directory
|
Enter the URL of the server from which the phone retrieves directory information.
Leave blank to use the default setting on the PBX.
|
Services
|
Enter the URL of the server the phone contacts when the guest presses the Services button.
Leave blank to use the default setting on the PBX.
|
Authentication Server
|
Enter the URL that the phone uses to verify requests made to the phone web server.
Leave blank to use the default setting on the PBX.
|
Message
|
Enter the URL for the message server, which the phone contacts when the guest presses the Messages button.
Leave blank to use the default setting on the PBX.
|
Idle URL
|
Enter the URL of the server from which the phone retrieves the information to display when the phone has been idle for the length of time specified in the Idle Timer Occupied or Idle Timer Unoccupied setting (as determined by room status).
Leave blank to use the default setting on the PBX.
|
Idle Timer Occupied
|
Enter the length of time, in seconds, the phone in an occupied room should be idle before the phone queries the server specified in the Idle URL setting to update the display.
Set to 0 to disable.
|
Idle Timer Unoccupied
|
Enter the length of time, in seconds, the phone in an unoccupied room should be idle before the phone queries the server specified in the Idle URL setting to update the display.
Set to 0 to disable.
|
URL Group to Set
|
Select which group of URLs to update, Secure or Standard. Secure URLs must use HTTPS (SSL) while Standard URLs use regular HTTP.
|
Multiple Locations
As noted previously, the settings on this page are tied to a specific location. To change the settings for a particular location, select that location using the provided drop-down box, change the other settings as needed, and then click Apply to save them. You can then select the next location to edit.
Note: If you have multiple locations and they all use the same CUCM, you will need to replicate and apply the same settings for each location.
|


