|
The Inventory Status Interface (ISI) is a telephony interface designed to allow users to report item and quantity information to one or more remote servers. Although the original conception was to provide a method for a hotel's housekeeping staff to report usage of items from the guest room mini-bar, the interface has been designed to allow for any type of inventory reporting a user may require.
Features
| • | PMS integration is not required. |
| • | Mailbox creation and voice mail integration is not required. |
| • | Auto-attendant support is not required (except for providing the telephony interface). |
| • | Unlimited number of user accounts. |
| • | Unlimited number of items. |
| • | Telephony interface supports user language preference. |
| • | Administration interface allows recording item descriptions in any supported language. |
| • | Web interface supports reporting of all item and user changes. |
| • | System supports posting changes simultaneously to as many as five remote servers. |
Requirements
ISI is a licensed IVR feature and must be purchased from the manufacturer on a per-site basis.
Configuration
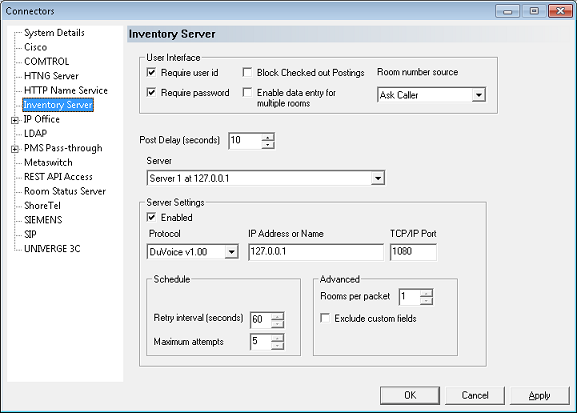
To configure the ISI server, run System Configuration and select Features | Connectors from the main menu; then select Inventory Server in the left pane, as shown in the figure below.

User Interface Settings
The first three settings listed relate to the telephony user interface and are therefore global in effect (that is, it does not matter which server you select from the drop-down list box, these settings are the same for all five servers).
Setting
|
Description
|
Require user id
|
Check this box if you want the system to prompt for a user ID at the start of the call.
If this option is disabled, the system will not ask for a password either.
|
Require password
|
Check this box if you want the system to require a valid password after prompting for the user ID.
If the Require user id setting is disabled, the system will never ask for a password, even if this setting is enabled.
|
Block Checked out Postings
|
Check this box if you want the system to block the housekeeping staff from posting mini-bar charges in checked-out rooms.
|
Enable data entry for multiple rooms
|
Check this box if you want the telephony interface to allow data entry for more than one room in the same call.
Default is disabled.
|
Room number source
|
Use the drop-down box to select the how the system determines the room number. The options are:
Option
|
Description
|
Ask Caller
|
Select this option to have the system always ask the caller for the room number.
|
Use Calling Party
|
Select this option to have the system use the calling party (caller ID) as received from the PBX.
If the calling party information was not provided by the PBX, then the system will ask the caller for the room number.
|
Use Called Party
|
Select this option to have the system use the called party as received from the PBX.
If the called party information was not provided by the PBX, then the system will ask the caller for the room number.
|
|
Global Settings
This section addresses server-side settings that are global across all servers.
Setting
|
Description
|
Post Delay (seconds)
|
Set the amount time after a change is sent to the ISI before it is posted to all configured servers. Value is in seconds.
Range is 10 to 999 seconds. Default is 60 seconds.
|
Per-Server Settings
Use the drop-down list box at the top to select which of the five possible remote servers you are configuring, then configure the remaining settings for that server:
Column
|
Description
|
Enabled
|
Check this box to enable the selected server.
|
Protocol
|
Use the drop-down box to select the protocol to use for the selected server. Options include:
Option
|
Description
|
DuVoice Version 1.00
|
Select this option if you are using the DuVoice API.
Unless you are using a Comtrol device, you should choose this option.
|
Comtrol
|
Select this option if you are using a Comtrol device.
|
Opera Minibar
|
Select this option if you are sending the minibar data through the PMS link to an Opera PMS and you want to use the Minibar message type.
|
Opera Direct Charge
|
Select this option if you are sending the minibar data through the PMS link to an Opera PMS and you want to use the Direct Charge message type.
|
|
IP Address or Name
|
Enter the IP address or server name for the remote server.
|
TCP/IP Port
|
Enter the TCP address to use to connect with the remote server.
|
Retry interval
|
Enter the number of seconds to wait after failing to connect to the remote server before making another attempt.
The default value is 60 seconds.
|
Maximum attempts
|
Enter the maximum number of times to attempt connecting to the remote server before logging a failure.
The default value is 30 attempts.
|
Rooms per packet
|
Enter the number of rooms whose data can be included in a single message packet.
This can be used to limit the packet size if the remote server cannot handle large packets.
The default is 100 rooms.
|
Exclude custom fields
|
Check this box if you want custom fields excluded from the packet.
Default is unchecked, meaning the custom fields will be included.
|
|


