|
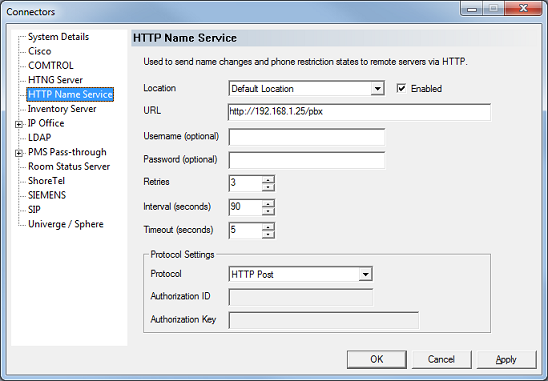
DV2000/DV4 can connect to a PBX using HTTP Post, if the PBX supports this protocol. This connector also supports the IPitomy PBX interface (select the IPitomy protocol, as discussed below).
The dialog below shows the configuration settings for this connection.

Settings include:
Setting
|
Description
|
Location
|
Select the location whose settings you want to review or edit.
Each location has its own settings and therefore can be connected to a different switch. If you have multiple locations connected to the same PBX, you will need to replicate the configuration for each location.
|
Enabled
|
Check this box to enable the connection for the selected location.
|
URL
|
Enter the URL to post information to.
If you are using SSL connections, make sure the URL starts with HTTPS.
You may specify a port number other than 80 or 443 by adding it to the URL For example, the URL https://192.168.1.25:4010/pbx would establish an SSL connection to 192.168.1.25 over port 4010.
|
Username (optional)
|
Enter the account username for logging into on the PBX, if needed.
|
Password (optional)
|
Enter the account password for logging into the PBX, if needed.
If Usename if specified, then this field is also required.
|
Retries
|
Enter the number of times to resend a post that is rejected or otherwise fails.
|
Interval (seconds)
|
Enter the number of seconds to wait between retries.
|
Timeout (seconds)
|
Enter the length of time, in seconds, to wait for a response from the server.
A timeout counts as a retry.
|
Protocol
|
Select the protocol to use.
| • | HTTP Post—Select this option for all cases except IPitomy. |
| • | IPitomy—Select this option if you are connecting to an IPitomy PBX. |
|
Authorization ID
|
If using the HTTP Post protocol, leave this blank.
|
Authorization Key
|
If using the HTTP Post protocol, leave this blank.
|
Configuring the Connector for IPitomy
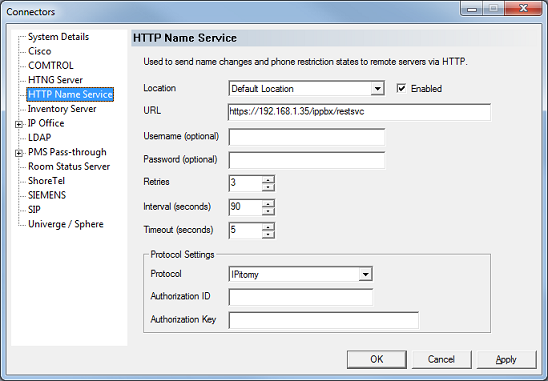
When connecting to an IPitomy PBX, there are a few settings that need special attention. The dialog below shows a sample configuration for connecting to the IPitomy.

Any settings not listed below are covered in the previous section above. This table only lists settings that require special attention when connecting to an IPitomy PBX.
Setting
|
Description
|
URL
|
As shown in the dialog above, this connection must use HTTPS. Replace the IP address with the IP address of your PBX.
You must include the /ippbx/restsvc part following the IP address, as shown in the dialog above.
|
Protocol
|
Select IPitomy.
|
Authorization ID
|
Enter the authorization ID to use when communicating with the PBX.
This is configured under Applications | External Apps from within the IPitomy configuration.
|
Authorization Key
|
Enter the authorization key to use when communicating with the PBX.
This is configured under Applications | External Apps from within the IPitomy configuration, and is listed under Authorization Phrase.
|
|


