|
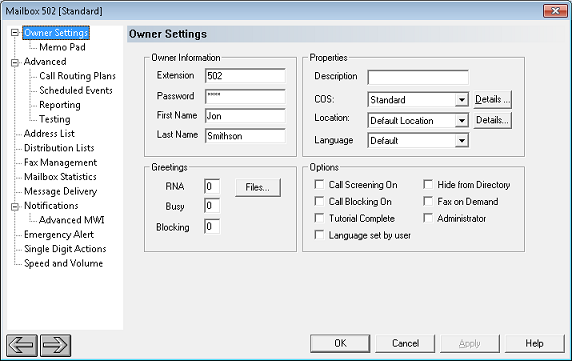
The standard mailbox is designed as a general-purpose subscriber mailbox type and should be used for most subscribers. It has the most configurable settings of any mailbox type, as exemplified in the screenshot below.

Owner Information
Setting
|
Description
|
Extension
|
Extension number assigned to this mailbox.
By default, it is the same as the mailbox number, but does not have to be.
|
Password
|
Subscriber password, masked using asterisks.
The default password is 1234, although this can be overridden when importing or resetting the mailbox.
|
First, Last Names
|
By default, the first name field is set to Standard plus the mailbox number and the last name field is left blank.
To ensure the mailbox appears correctly in the spell-by-name directory, enter the first and last names of the subscriber assigned to this mailbox (at least enter the first three letters of each name). The subscriber will still need to record his or her name, as part of the tutorial, or the mailbox will not appear in the directory.
Maximum length is 24 characters. The following characters are not allowed: [\/|"]
|
Properties
Setting
|
Description
|
Description
|
Use this field to add a further description if desired. Optional. Displayed in the mailbox list in Mailbox Administration, but not otherwise used.
Maximum length is 19 characters. The following characters are not allowed: [\/|"]
|
COS
|
Select the Class of Service (COS) template to assign to this mailbox.
One of the selection options is Create New, which will allow you to create a new global template that you can use for this mailbox. Although the new template can be assigned to any mailbox, the primary purpose for this option is to create a template you can customize for this mailbox without adversely affecting other mailboxes.
To review or edit the template, you can click on the Details button to open the COS editor dialog. Warning: Changing a class of service template may affect more than just the mailbox you are editing!
|
Location
|
Select the Location to assign to this mailbox.
Click the Details button to view the selected location's settings. Read only.
|
Language
|
Select the language to use in the mailbox subscriber menu.
When set to Default, it will use the global default language as defined in System Configuration.
If the COS is configured to allow the subscriber to select a language and this setting is set to Default, the system will ask the subscriber to choose a language the next time he or she logs into the mailbox.
|
Greetings
This section allows you to view and assign any of the nine mailbox greetings to any of three cases: RNA, busy or blocked. Greetings may also be activated using scheduled events.
| • | RNA—Played whenever a call is forwarded to voice mail on ring-no-answer (RNA). |
| • | Busy—Played whenever a call is forwarded to voice mail on a busy condition. |
| • | Blocking—Played whenever a call is forwarded to voice mail on a DND condition, or if the Call Blocking On option has been enabled. |
The default setting in all three cases is 0 (i.e. no greeting assigned). Depending on the COS, the system may play a generic default greeting in this case. At first login, the subscriber will be prompted to record a ring-no-answer greeting (greeting 2) which will then be assigned to all three cases.
Note: Most telephone switches do not provide unique RNA, Busy or DND codes. In such cases, all calls appear as RNA and will play the RNA greeting. That is why the new user tutorial sets all three greetings to use greeting 2.
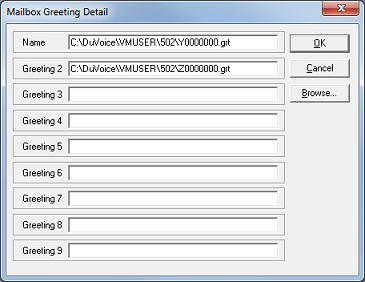
Clicking the Files... button opens the Mailbox Greeting Detail dialog, as shown below. Using this dialog, you can view the full paths and filenames of the eight possible greetings and the name recording for the spell-by-name directory.

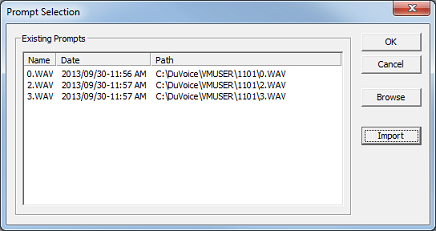
To manually change the greeting, click in one of the edit boxes and then click the Browse button to open the Prompt Selection dialog, shown below, which will allow you to select a different greeting file.

To import a voice file from another location as a new greeting file in the selected mailbox, click the Import button and use the Open dialog to browse to the location of the file you want to import. Select it and click Open to add a copy of the file to this mailbox. Note that the copied file will be renamed. If you want to use a voice file as a greeting without making a local copy in the mailbox folder, you can click the Browse button and use the Open dialog to navigate to any other valid greeting or prompt file (with either a .wav or .grt extension) and assign it directly to the selected greeting number.
One advantage to using Import rather than Browse is that if the voice file is not in the correct WAV format (8-bit 8KHz mu-Law PCM WAV), the system will attempt to convert to the correct format when it copies the file into the mailbox folder. Note that this conversion process is not guaranteed to work, as it depends on having the necessary audio codecs installed on the system. While the Windows operating system typically has several standard audio codecs installed, it may not have the one you need. However, most any of the common WAV formats should work fine (such as: Microsoft CCITT G.711 or MS PCM).
One way to check which audio codecs are loaded on your system is to open a class of service (COS) template, select the VeMail tab and then check the drop-down list labeled WAV file format. That drop-down box should list all compatible audio codecs loaded on the system.
Options
Setting
|
Description
|
Call Screening On
|
Check this box to enable call screening for this mailbox.
By default, call screening is disabled.
If call screening is enabled, supervised transfers will be used for this mailbox regardless of the transfer type specified by its COS. Tone training for the VMS may be required to ensure correct call progress analysis.
If your extension is forwarded to voice mail and you are using call screening, you cannot use the DND (Send All Calls) button at your extension.
Not supported on SIP-enabled systems.
|
Call Blocking On
|
Check this box to block transfers to the extension. Callers who attempt to transfer to the extension from the auto attendant will be redirected to leave a message.
By default, this option is disabled.
Any message-only mailbox (one that has no physical extension) should have this option enabled.
|
Tutorial Complete
|
This setting is automatically checked once you have logged into the mailbox (via phone) for the first time and have gone all the way through the new user tutorial (setting a password and recording a name).
Uncheck this box if you want to go through the tutorial again. Warning: This will delete the greeting and the name recording.
|
Hide from Directory
|
Check this box if you do not want the mailbox to be discoverable via the dial-by-name guest directory.
By default, this option is enabled, so the mailbox will not be included in the directory.
|
Fax On Demand
|
Check this box to allow the subscriber to manage fax on demand documents from within the subscriber menus.
By default, this option is disabled, and should only be enabled if the mailbox is intended to offer a Fax on Demand option to callers.
Not supported on SIP-enabled systems.
|
Administrator
|
Check this box to enable access to the Administrator System Events property page. This is only needed if you want to be notified when disk space is running low.
By default, this option is disabled.
|
Language set by user
|
If checked, the language has been set by the user from the subscriber menu.
If unchecked, the subscriber will be prompted for a language selection the first time he or she logs in to retrieve messages, as long as the following conditions are all met:
| • | More than one language has been installed and activated |
| • | The language is currently set to Default |
If the language is set to anything other than Default using either the PMS or Mailbox Administration, the subscriber will never be prompted to select a language.
|
|


