|
Several PMS protocols define a message command that the VMS can send to specify the maid status for a guest room, but the actual maid status values vary from protocol to protocol. Consequently, the DV2000/DV4 provides a table in which the supported maid codes can be defined.
Most PBX and PMS protocols (with the notable exception of the Nortel protocol) send the maid status value as a single-digit number. Normally, the VMS will pass the digit received from the PBX (or InnDesk or the guest mailbox user interface) directly to the PMS, as-is. However, in some cases, the PBX and the PMS do not agree on what the values are. For example, the PBX may send a 0 to indicate the room is dirty (and a 1 for clean) while the PMS may be expecting a 1 for dirty (and a 2 for clean). For these situations, the DV2000/DV4 provides a simple translation work-around, using the Display Text field, as described in the instructions below.
Follow these instructions if:
| • | You are not using the Nortel protocol for either the PMS or the PBX link. |
| • | The staff will be dialing the PBX short codes to signal maid status changes. |
| • | The PBX and the PMS do not agree on what digits to use and/or what each digit means. |
If any of the three conditions above is not true, and you are not using the Nortel protocol for either link, follow the instructions in the Configure the maid codes section instead.
If you are using Nortel for either link, refer to the Configure the maid codes for Nortel section for the correct instructions.
There are three possible sources for the maid codes, as supported by the DV2000/DV4. They are:
Source
|
Description
|
PBX
|
The maid dials a PBX short code and the PBX then sends a message over a dedicated hospitality link to the VMS. The VMS interprets the message sent by the PBX and then sends an appropriate maid status message to the PMS.
|
VMS
|
The maid accesses the room's mailbox and dials 61n, where n is a digit from 0 to 9 representing the desired maid status code. The VMS then sends the appropriate maid status message to the PMS.
The VMS may also be configured to automatically change the maid status to a particular value at check out and/or during nightly maintenance. Depending on configuration, it may pass this change to the PMS.
|
InnDesk
|
The administrator uses InnDesk to assign a new maid status to the room. InnDesk passes the new value on to the hospitality service, which sends the appropriate maid status message to the PMS.
|
Note: The Room Status Interface (RSI) IVR application can also be used for passing on maid status changes. However it is a completely stand-alone application that does not interface with the hospitality service, and therefore RSI activity is not passed on to the PMS through the standard PMS link. The RSI application uses a custom API over HTTP to pass maid status information to third-party applications and is not subject to the configuration settings described in this section.
To configure the maid codes with translation between the PBX and the PMS, follow these steps:
1. Using Activity Monitor, stop the voice mail service.

2. Run the System Configuration application and select Features | Hospitality.

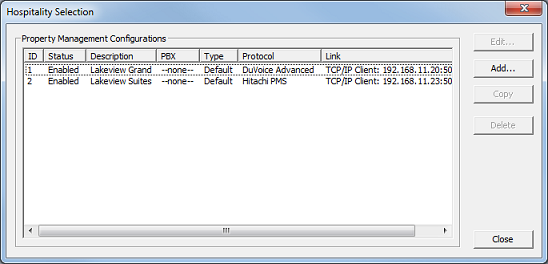
3. If prompted, select the PMS instance (as shown below). This dialog is only displayed if you are licensed for more than one PMS instance. Otherwise, skip to step 4.

4. Select the Maid Codes property page (located under PMS in the tree view on the left).
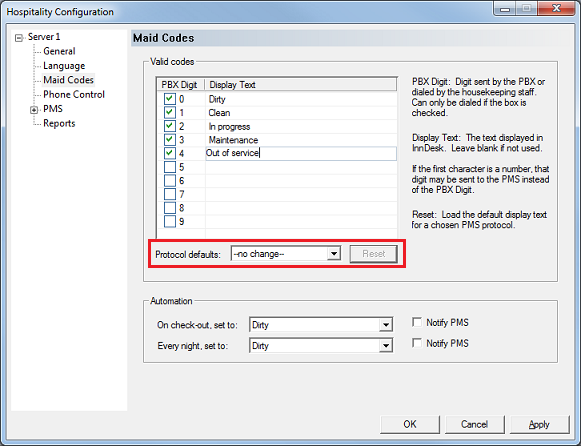
| 5. | Use the Protocol defaults drop-down box to select which protocol's default maid codes you want to use. If you don't know which protocol to select or your protocol is not listed, you can choose Default as a starting point. Then click Reset to load the defaults for the selected protocol. |

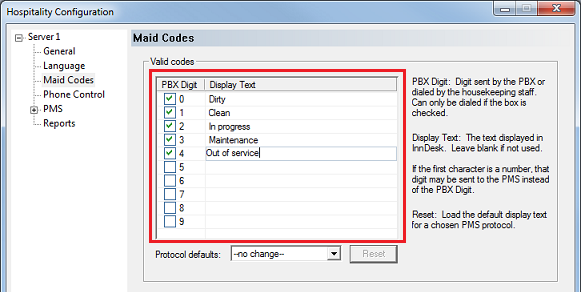
| 6. | If the housekeeping staff will be dialing the VMS maid codes (from within the guest mailbox, using the 61n codes): Check the box next to each digit you want the staff to be able to dial. If there are codes that should only be set by an administrator (using InnDesk, for example), then uncheck the box next to that digit. If the staff will be dialing PBX short codes instead and you want to block use of the VMS interface, you can uncheck all the boxes. |

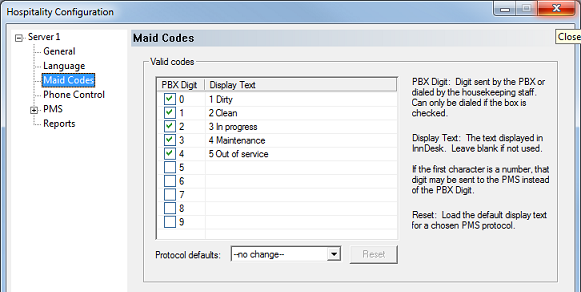
| 7. | For each valid digit (whether dialed from the guest mailbox or sent from the PBX), enter a useful description in the Display Text column. Click on the field in the correct row, then edit the text as desired. The existing text is set to match the default meaning for each code as defined in the protocol specification for the selected protocol, but you can change it to match your PMS as needed. To alter what digit is passed to the PMS, enter the single digit as the first character in this field, then add the text description after it, as shown in the example below. In this example, if the PBX sends a 0 the VMS will send a 1 to the PMS (and so forth for the other digits). |

| 8. | Use the On check-out, set to drop-down list box to select the maid status value to automatically assign to the mailbox at check out. If this change needs to be sent to the PMS, check the Notify PMS box to the right of the list box. However, if the PMS auto-changes the status itself, leave this box unchecked. |

| 9. | Use the Every night, set to drop-down list box to select the maid status value to automatically assign to each occupied mailbox during nightly maintenance. If this change needs to be sent to the PMS, check the Notify PMS box to the right of the list box. However, if the PMS auto-changes the status itself, leave this box unchecked. |
| 10. | Click Apply to save the setting without closing the dialog. |
| 11. | If you are finished configuring hospitality settings, click OK to save and close the dialog. |
| 12. | If the Hospitality Selection dialog was displayed (in step 3), click Close to close it. |
| 13. | Once you are finished with all configuration changes, close System Configuration. |

|


